


A Comprehensive Guide to the Mitsubishi Lancer Starter Motor
The Mitsubishi Lancer, a beloved compact sedan, is known for its sporty performance and sleek design. But even the most reliable vehicles can face mechanical challenges. One essential component that often gets overlooked is the starter motor. This unsung hero plays a crucial role in getting your engine roaring to life each time you turn the key. Whether you're looking to enhance functionality or troubleshoot issues, knowing more about your Mitsubishi Lancer starter motor could save you time and money. Buckle up as we dive deep into everything you need about this critical automotive component!
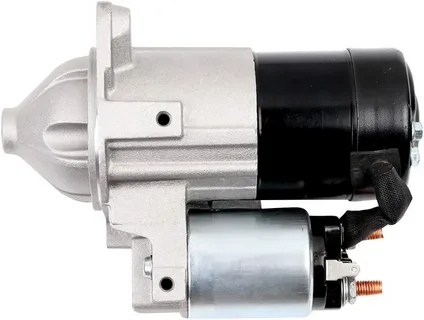
The Role of the Lancer Starter Motor
The starter motor is the unsung hero of your Mitsubishi Lancer. The small but mighty device brings your engine to life with a simple key twist. Imagine it as the spark plug for ignition; without it, all you have is silence.
When you turn that ignition switch, electrical current flows from the battery to the starter motor. This initiates a series of events: gears engage, and your engine roars into action within seconds. Without this crucial component, you'd be stranded in your driveway like an eager driver waiting for a bus that never arrives.
But its role goes beyond just getting things started. The Lancer Starter Motor ensures smooth operation whenever you want to hit those open roads or navigate city traffic. A well-functioning starter means dependable starts on cold mornings and peace of mind during long journeys.
This little dynamo may struggle under pressure over time and with wear and tear. Issues can range from sluggish starts to complete failure—each spell trouble when you're counting on reliability from your Lancer.
So next time you hop into your car ready for adventure, take a moment to appreciate what happens behind the scenes once you turn that key—a seamless blend of engineering prowess working thanks to one vital player: the starter motor harmoniously!
Improving Functionality with a Starter Motor
The Mitsubishi starter motor is more than just a component; it’s your vehicle's heartbeat. When you turn the key, this little powerhouse springs to life, ensuring that your engine roars into action. It connects seamlessly with the battery and ignition system, ensuring everything works harmoniously.
Upgrading or replacing an aging starter motor can significantly enhance performance. A new model often offers improved torque, allowing smoother starts even in colder weather conditions. That means fewer frustrating mornings spent trying to coax an unresponsive engine back to life.
A high-quality starter motor also reduces wear on other parts of your car's electrical system. With less strain on the battery and alternator during those crucial starting moments, you can also extend their lifespan. It’s all about efficiency—keeping everything running as smoothly as possible.
Regularly maintaining your starter motor improves functionality and ensures reliability when you need it most. No one wants unexpected breakdowns ruining their day or adventure plans!
If you want extra muscle under the hood, explore aftermarket options for performance enhancement. Whether you're after better cranking power or quicker response times, there's a perfect fit out there waiting just for you.
Diagnosing the Starter Motor Mitsubishi Lancer Issues
When your Mitsubishi Lancer refuses to start, the culprit might lurk in its starter motor's shadows. A faulty starter can leave you stranded and scratching your head. The first step is listening closely; clicking often means the battery has enough juice but isn’t delivering it effectively.
Next, take a look at the dashboard lights. If they’re dim or flickering when you turn the key, it's a telltale sign that power isn't reaching where it needs to go. This could indicate an issue with your battery or starter motor connections—It's time to get those tools out!
If you're feeling adventurous, gently tap the starter while someone turns the ignition key. Sometimes, this simple persuasion can revive even stubborn components long enough to diagnose further issues.
Remember the wiring! Check for frayed cables or loose connections leading into and from the starter motor. Corrosion at connectors can create resistance that stops everything dead in its tracks.
If all these checks yield no results, consider testing voltage at the solenoid terminals. Low readings here suggest that replacement is on your horizon—a new Starter Motor Mitsubishi Lancer might be necessary to breathe life back into your ride!
Steps Involved in Replacing Starter Motor
Replacing the starter motor in your Mitsubishi Lancer can seem daunting, but with a few simple steps, you’ll be back on the road in no time. First things first: gather your tools. You’ll need a socket set, screwdrivers, and perhaps some gloves to keep everything neat.
Start by disconnecting the battery. Safety is key here—nobody wants an unexpected spark while working under the hood! Once that’s done, locate the starter motor, which is typically found near the engine block. A little flashlight will help shine light on those hard-to-reach spots.
Next, remove any components blocking access to your starter motor. This may include heat shields or even wiring harnesses—just take it slow and remember where everything goes for reassembly later. With these out of the way, unbolt the starter from its mountings and gently pull it free.
Now it’s time to install your new Mitsubishi starter motor. Position it carefully before securing it with bolts; ensure they’re tight but not overdone! Reconnect all electrical connections, ensuring each wire is firmly attached.
At this point, you're almost there! Don't forget to reconnect your battery before testing out that fresh start you've installed. Turn that key and listen for that satisfying roar of an engine coming back to life—it feels like magic every time!
Troubleshooting the Starter Motor issues
Encountering issues with your Mitsubishi starter motor can feel like a jolt of frustration. You turn the key, and nothing happens—silence fills the air. Before you panic, it's time to roll up your sleeves and dive into some troubleshooting.
Start by checking the battery. A weak or dead battery is often the culprit behind starting problems. Ensure it’s fully charged and that all connections are clean and tight. Corroded terminals can create resistance, leading to a no-start situation.
Next on your checklist: listen for clicks when you turn the ignition switch. A single click might indicate that your starter motor is engaging but struggling to turn over the engine due to mechanical issues or a faulty solenoid connection. Multiple rapid clicks usually point toward insufficient power reaching the starter motor.
Don’t forget about fuses! Check for blown fuses connected to the ignition and starting circuits; this small detail could save you from unnecessary repairs.
If everything seems fine but you’re still experiencing trouble, consider testing or replacing components within the starter assembly itself—like brushes or armature windings—that may wear out over time. Each step brings you closer to pinpointing what’s holding back the reliable roar of your Lancer’s engine.
Installation Process of the Starter Motor
Preparation is key when installing a Mitsubishi starter motor. Start by ensuring your workspace is tidy and well-lit. Gather all necessary tools, such as wrenches, sockets, and screwdrivers. This will help eliminate any frustration during the process.
Next, remember safety first! Disconnect the negative battery cable to avoid any electrical mishaps while you work on your vehicle. It’s always better to be safe than sorry when dealing with car electronics. Once this step is complete, locate the old starter motor; it's usually situated near the engine block.
Once you've pinpointed its location, remove any components that might obstruct access—this could include air intakes or brackets. Carefully loosen and remove the bolts holding down the existing starter motor so as not to damage them when reinstalling it later if needed.
With a gentle pull, detach the old starter from its socket and disconnect the attached wiring harnesses. Now it's time for some excitement—the new Mitsubishi starter motor awaits! Position it properly in place and reconnect all wiring just as it was initially set up.
Securely fasten every bolt back into place using a torque wrench if possible. This ensures everything fits snugly without risking loosening over time. Reconnect that negative battery cable last before taking your ride for a spin!
Testing the 2007 Mitsubishi Lancer Starter Motor
Testing the 2007 Mitsubishi Lancer starter motor is essential in diagnosing starting issues. When your Lancer refuses to crank, it's time to get hands-on. Begin by ensuring you have all the necessary tools: a multimeter, a wrench set, and appropriate safety gear.
Start your diagnostic process by checking the battery's voltage. A weak battery can mimic starter motor problems, so connect your multimeter to the battery terminals. A healthy battery should show at least 12.4 volts. If the reading falls short, consider charging or replacing the battery before you move on to testing the starter motor itself.
Next, locate your starter motor under the vehicle’s hood—typically near the engine block. Carefully inspect its connections for any signs of corrosion or loose wires, and clean away any debris that might be creating resistance and affecting performance. Proper electrical connections are crucial for the starter to function correctly.
Test the starter once you’ve confirmed that the connections are secure and clean. Attach your multimeter directly to one of the starter's terminals while someone turns the ignition key. You should observe a steady flow of power; if there is no reading or it is significantly low, this is a strong indicator that the starter motor is faulty.
If you suspect the starter is sticking, gently tap with a sturdy, non-destructive tool like a rubber mallet. This classic mechanic’s trick can sometimes temporarily jolt the starter into action, offering further clues about its condition. Following these steps, you can accurately diagnose the issue and determine whether a repair or replacement is necessary.
Conclusion
The Mitsubishi Lancer starter motor is crucial to your vehicle's performance. The unsung hero brings your car to life, enabling smooth starts every time you turn the key. Understanding its importance creates an appreciation for this essential component. Regular maintenance can extend the life of your starter motor and improve overall functionality. A little care goes a long way in ensuring that this vital part remains reliable throughout its lifespan. Knowing what to look for can save you from unexpected breakdowns. Replacing involves specific steps that require attention to detail and some mechanical knowledge.
FAQS
What symptoms indicate a failing starter motor?
Common signs include unusual clicking sounds when turning the key, dimming dashboard lights when starting, or an engine that won’t crank at all.
How long does a Mitsubishi Lancer starter motor typically last?
On average, a Mitsubishi Lancer starter motor can last between 100,000 and 150,000 miles, but this varies depending on driving habits and maintenance practices.
Can I replace the starter motor myself?
Yes! If you have basic mechanical skills and tools, replacing your faulty Mitsubishi starter motor can be a DIY project. Just follow safety precautions and consult your vehicle’s manual for guidance.
Is there any specific maintenance required for my starter motor?
Regular checks of electrical connections and battery health significantly extend your starter motor's life. Keeping these components in good shape minimises wear.
Where can I find replacement parts for my Mitsubishi Starter Motor?
You can source genuine parts from dealerships or opt for reputable online retailers offering aftermarket options explicitly tailored for Mitsubishis.
|
Related Business Listings |
الأقسام
إقرأ المزيد
Math can be challenging for many students, leaving them feeling overwhelmed and frustrated. Finding the right support is crucial if you're struggling with basic arithmetic or advanced calculus. That’s where Maths Tutors near Me come in. They offer expert help tailored to every level of understanding, making complex concepts more accessible and less daunting. Imagine having someone by your...
Inhalable Drugs Market Size And Forecast by 2032 According to Data Bridge Market Research The global inhalable drugs market size was valued at USD 30.76 billion in 2024 and is projected to reach USD 47.74 billion by 2032, with a CAGR of 5.65% during the forecast period of 2025 to 2032. Pulmonary Drug Delivery Market continues to dominate the industry with its commitment to innovation...
Introduction Online slots have gained immense popularity in the UK, attracting thousands of players seeking thrilling gameplay, big wins, and an immersive casino experience from the comfort of their homes. With the rapid rise of online gambling, numerous slots sites uk have emerged, offering a wide array of slot games, bonuses, and promotions. Whether you are a seasoned player or a beginner,...
Mini tractors are the perfect option for budget-conscious farmers who wish to obtain efficient and productive outcomes. The good news is that well-known brands have mini tractors available at reasonable prices, with competitive market rates. Various popular brands in India, including Mahindra, Sonalika, Swaraj, John Deere, Massey Ferguson, and New Holland, have been producing mini tractors...

The TS Astra Electric Power Steering Pump showcases a modern approach to vehicle steering technology, transitioning away from traditional hydraulic systems. This component is essential for achieving seamless and responsive steering, particularly in contemporary car models. Designed with energy efficiency and advanced performance in mind, it eliminates the need for hydraulic fluid, reducing...